What is a Pixel?
A pixel, short for “picture element,” is the smallest unit in a digital image. Each pixel holds a single color, and when arranged in a grid, millions of pixels form a complete image. These blocks of color work together to create photographs, illustrations, and graphics seen on screens and in printed media. For those learning how to change the color of a picture or adjust image details, understanding pixels is essential to mastering digital editing.
Pixels are positioned side by side in structured rows and columns. The total number of pixels in an image defines its resolution. Higher resolution images contain more pixels, which results in finer detail and smoother color transitions. A sharper image often means greater control over subtle variations, particularly when attempting to change color of an image with precision. Each of these pixels can be individually adjusted or modified as a group, depending on the tool or function being used.
Every pixel in a digital image contains color information, and in most cases, this is based on RGB values: Red, Green, and Blue. These colors blend in varying intensities to create the final hue for each pixel. The resulting color can be represented using a hexadecimal code, a standard method for recording digital colors. When someone chooses to change photo color in a section of an image, they are essentially adjusting these color values at the pixel level.
Pixels are more than just color squares. They can also include brightness and transparency values, giving editors flexibility when layering, blending, or masking elements. Understanding how these attributes work makes it possible to create professional-looking designs, whether adjusting a photograph or building a visual from scratch. A solid grasp of what a pixel is and how it behaves will improve nearly every type of digital image adjustment.
Why Are There Hexadecimals in Pictures?
Hexadecimal codes are the foundation of how colors are defined in digital images. Each pixel in a digital image contains a specific color, and that color is described using a six-digit hexadecimal value. This system breaks down each color into red, green, and blue components, allowing for millions of color variations. For those working in image editing, understanding this color system is essential when trying to change photo color or adjust visual elements with precision.
When editing an image, especially when aiming to change color of image areas, hexadecimal values allow for exact control over each pixel. These codes range from 00 to FF (in base-16), with two characters assigned to each RGB component. For example, a pixel with the code #FF0000 represents a pure red color, while #00FF00 is bright green. By changing these values, image editors can alter specific parts of an image with high accuracy, making hexadecimals an essential tool for professionals and hobbyists alike.
Hexadecimal codes are also vital because they ensure consistency across digital platforms. A color defined in hexadecimal in Photopea or Photoshop will appear the same across different devices and software. This consistency is especially important for branding, product photography, or any situation where exact color matching is required. When the goal is to change the color of a picture across multiple designs or outputs, hexadecimal color codes provide a stable reference point.
Another advantage of hexadecimals is the vast range of unique colors that can be produced. With 256 possible values per channel and three channels per pixel, the total color combinations exceed 16 million. This expansive color space is what enables us, as editors, to create vibrant visuals, intricate palettes, and targeted adjustments. Whether performing a subtle tone shift or attempting to completely change photo color, the use of hexadecimals remains one of the most powerful tools available in digital editing.
What exactly is “Color of Image”?
The color of an image refers to the exact hexadecimal code for each pixel within an image. When someone refers to the color of an image or “color of image”, they are referring to the exact hexadecimal code for that specific color in that pixel. Each pixel contains only a single hexadecimal code that corresponds to a specific color.
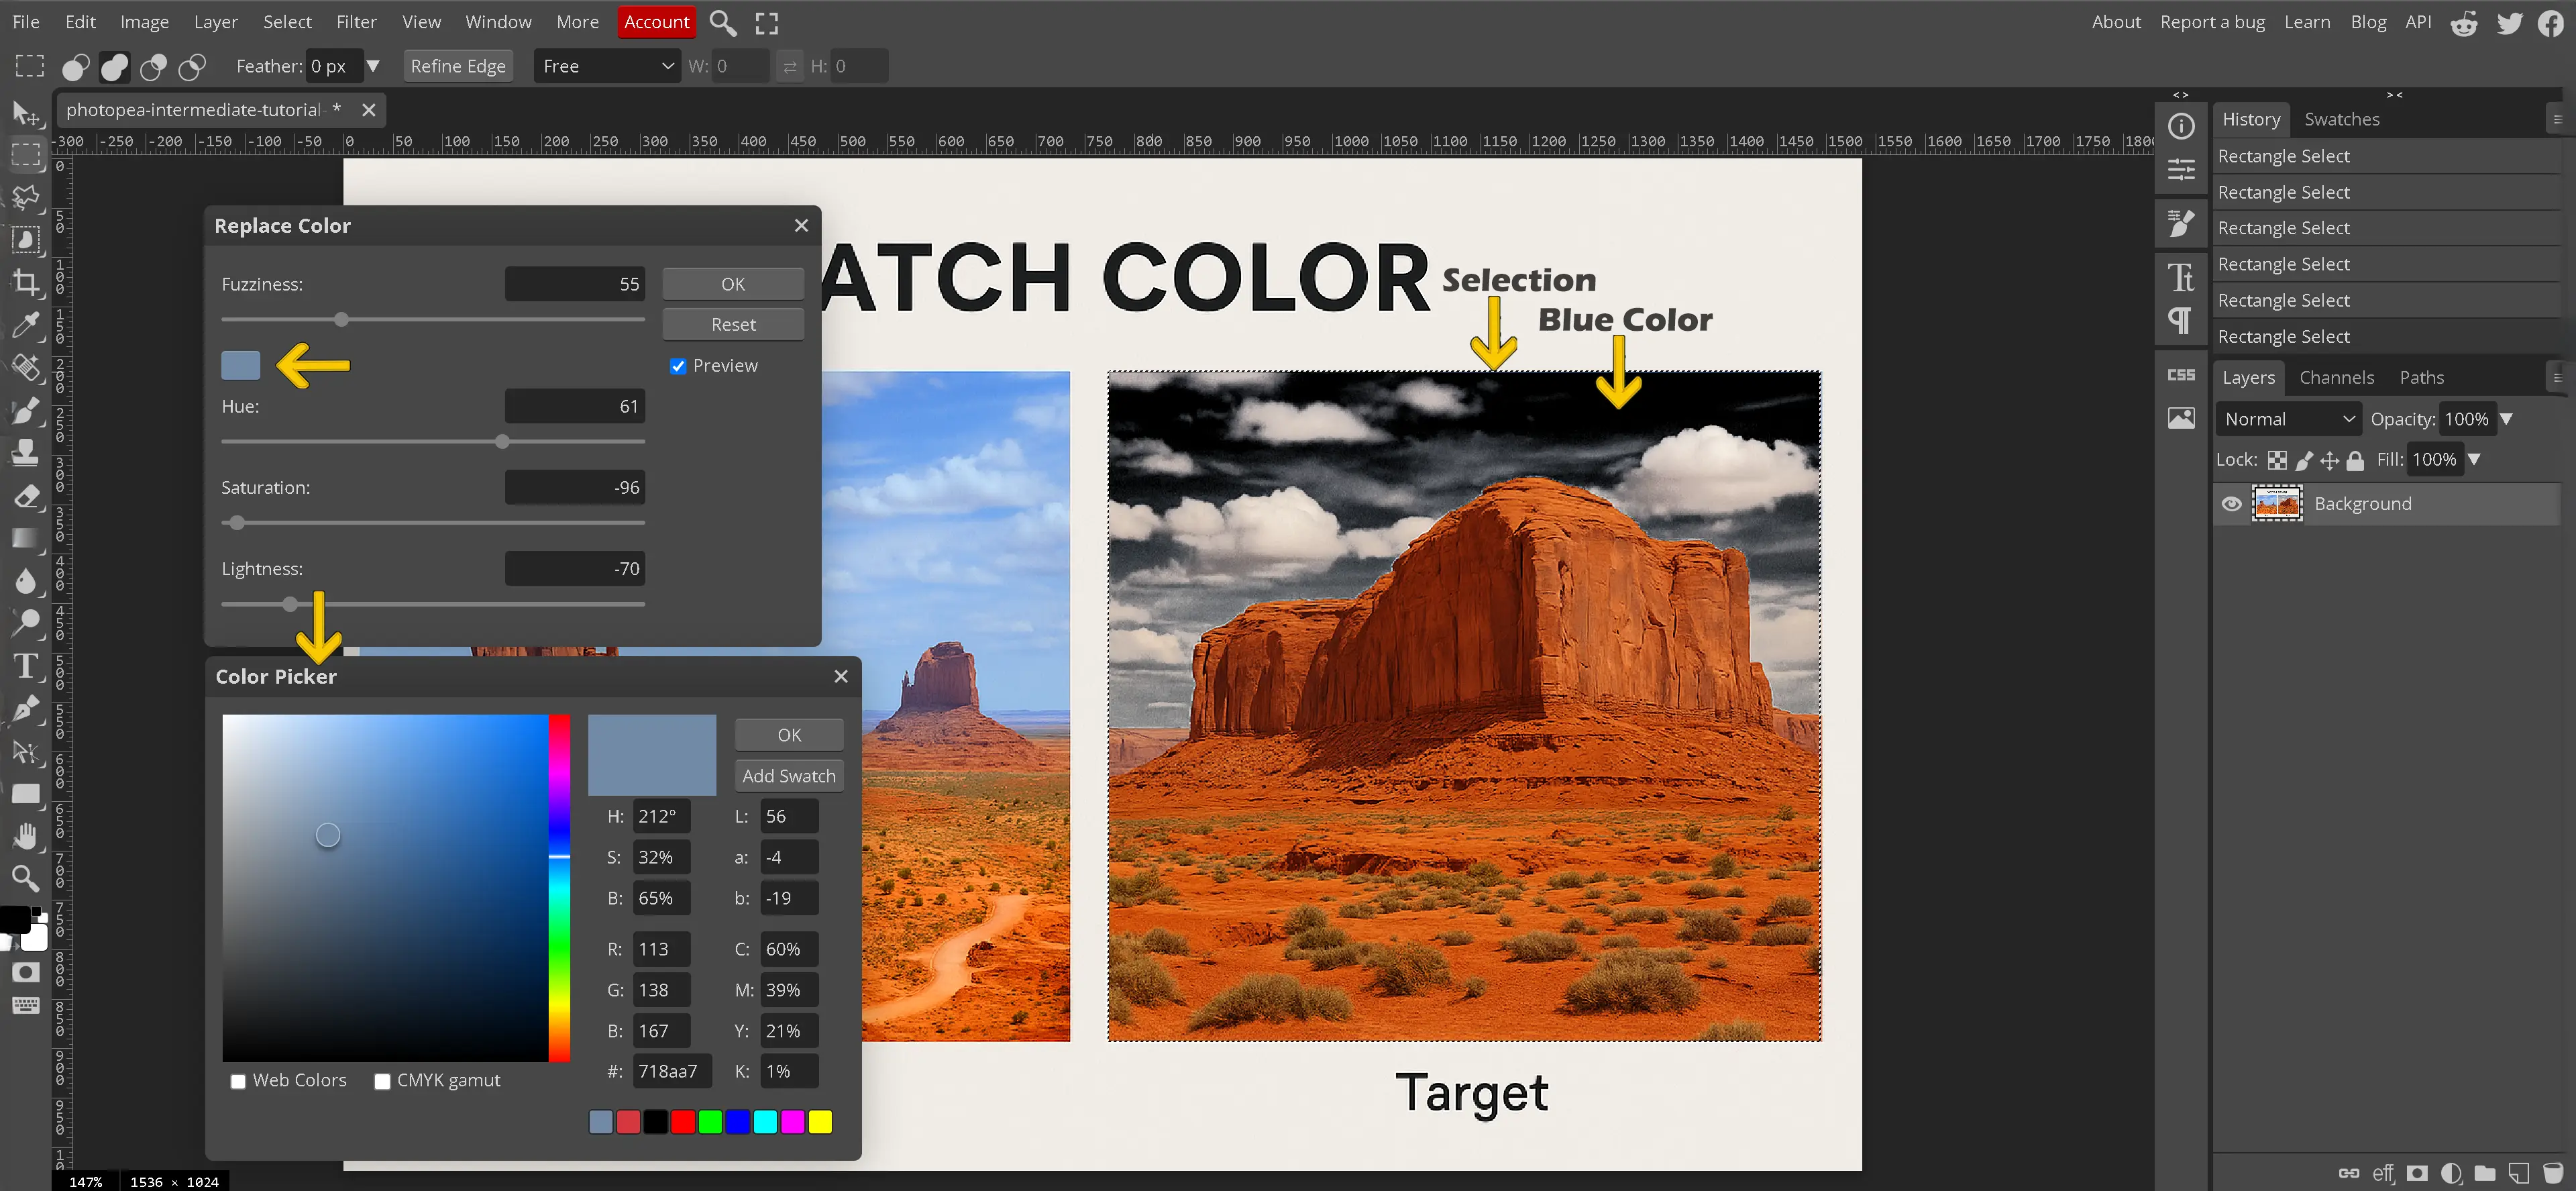
In Photopea, both Replace Color and Channel Mixer can be found under the Image > Adjustments menu. To use Replace Color, go to Image > Adjustments > Replace Color. A new panel opens with options to select the color range that needs replacing, along with controls for hue, saturation, and lightness. Click the preview area to select a color in the image, then move the sliders to shift it to a new color. This feature is especially helpful when changing a specific object's color, such as swapping a shirt from green to blue without affecting the rest of the photo.
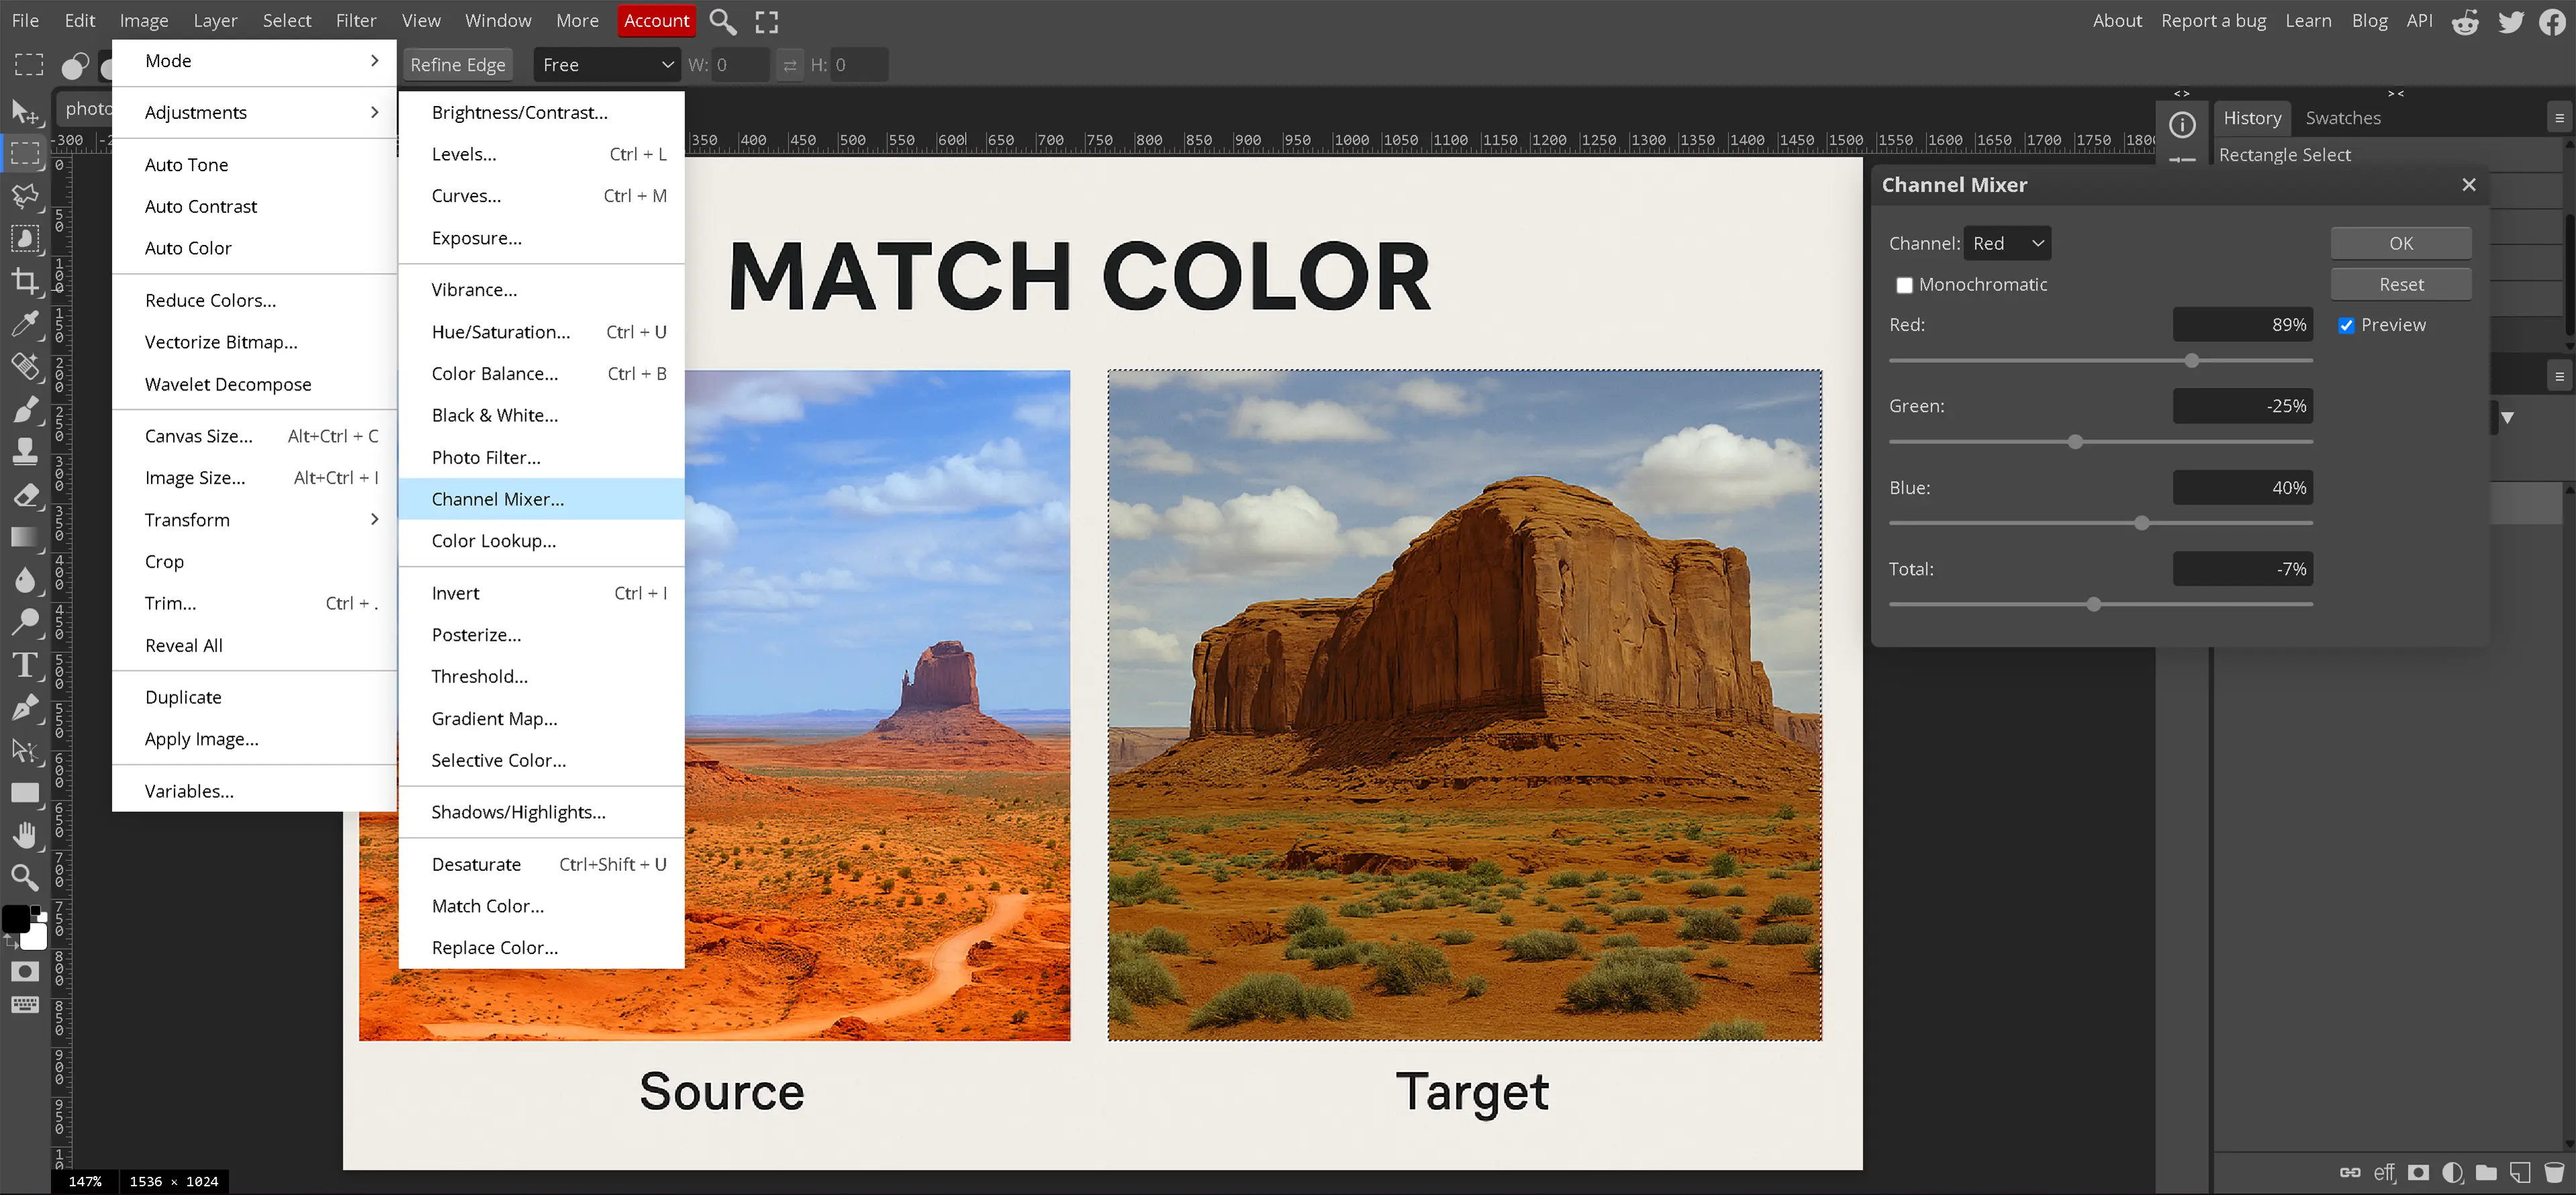
The Channel Mixer is accessed by going to Image > Adjustments > Channel Mixer. This opens a panel with control sliders for the red, green, and blue channels. By adjusting these sliders, each color channel can be rebalanced. For example, increasing the red input in the blue channel will create a warm tint across the image. This tool is valuable for refining color tone, repairing incorrect lighting, or creating stylized looks. The Channel Mixer allows detailed changes that affect the overall color structure of an image.
How Do We Find the Color of an Image in Photopea?
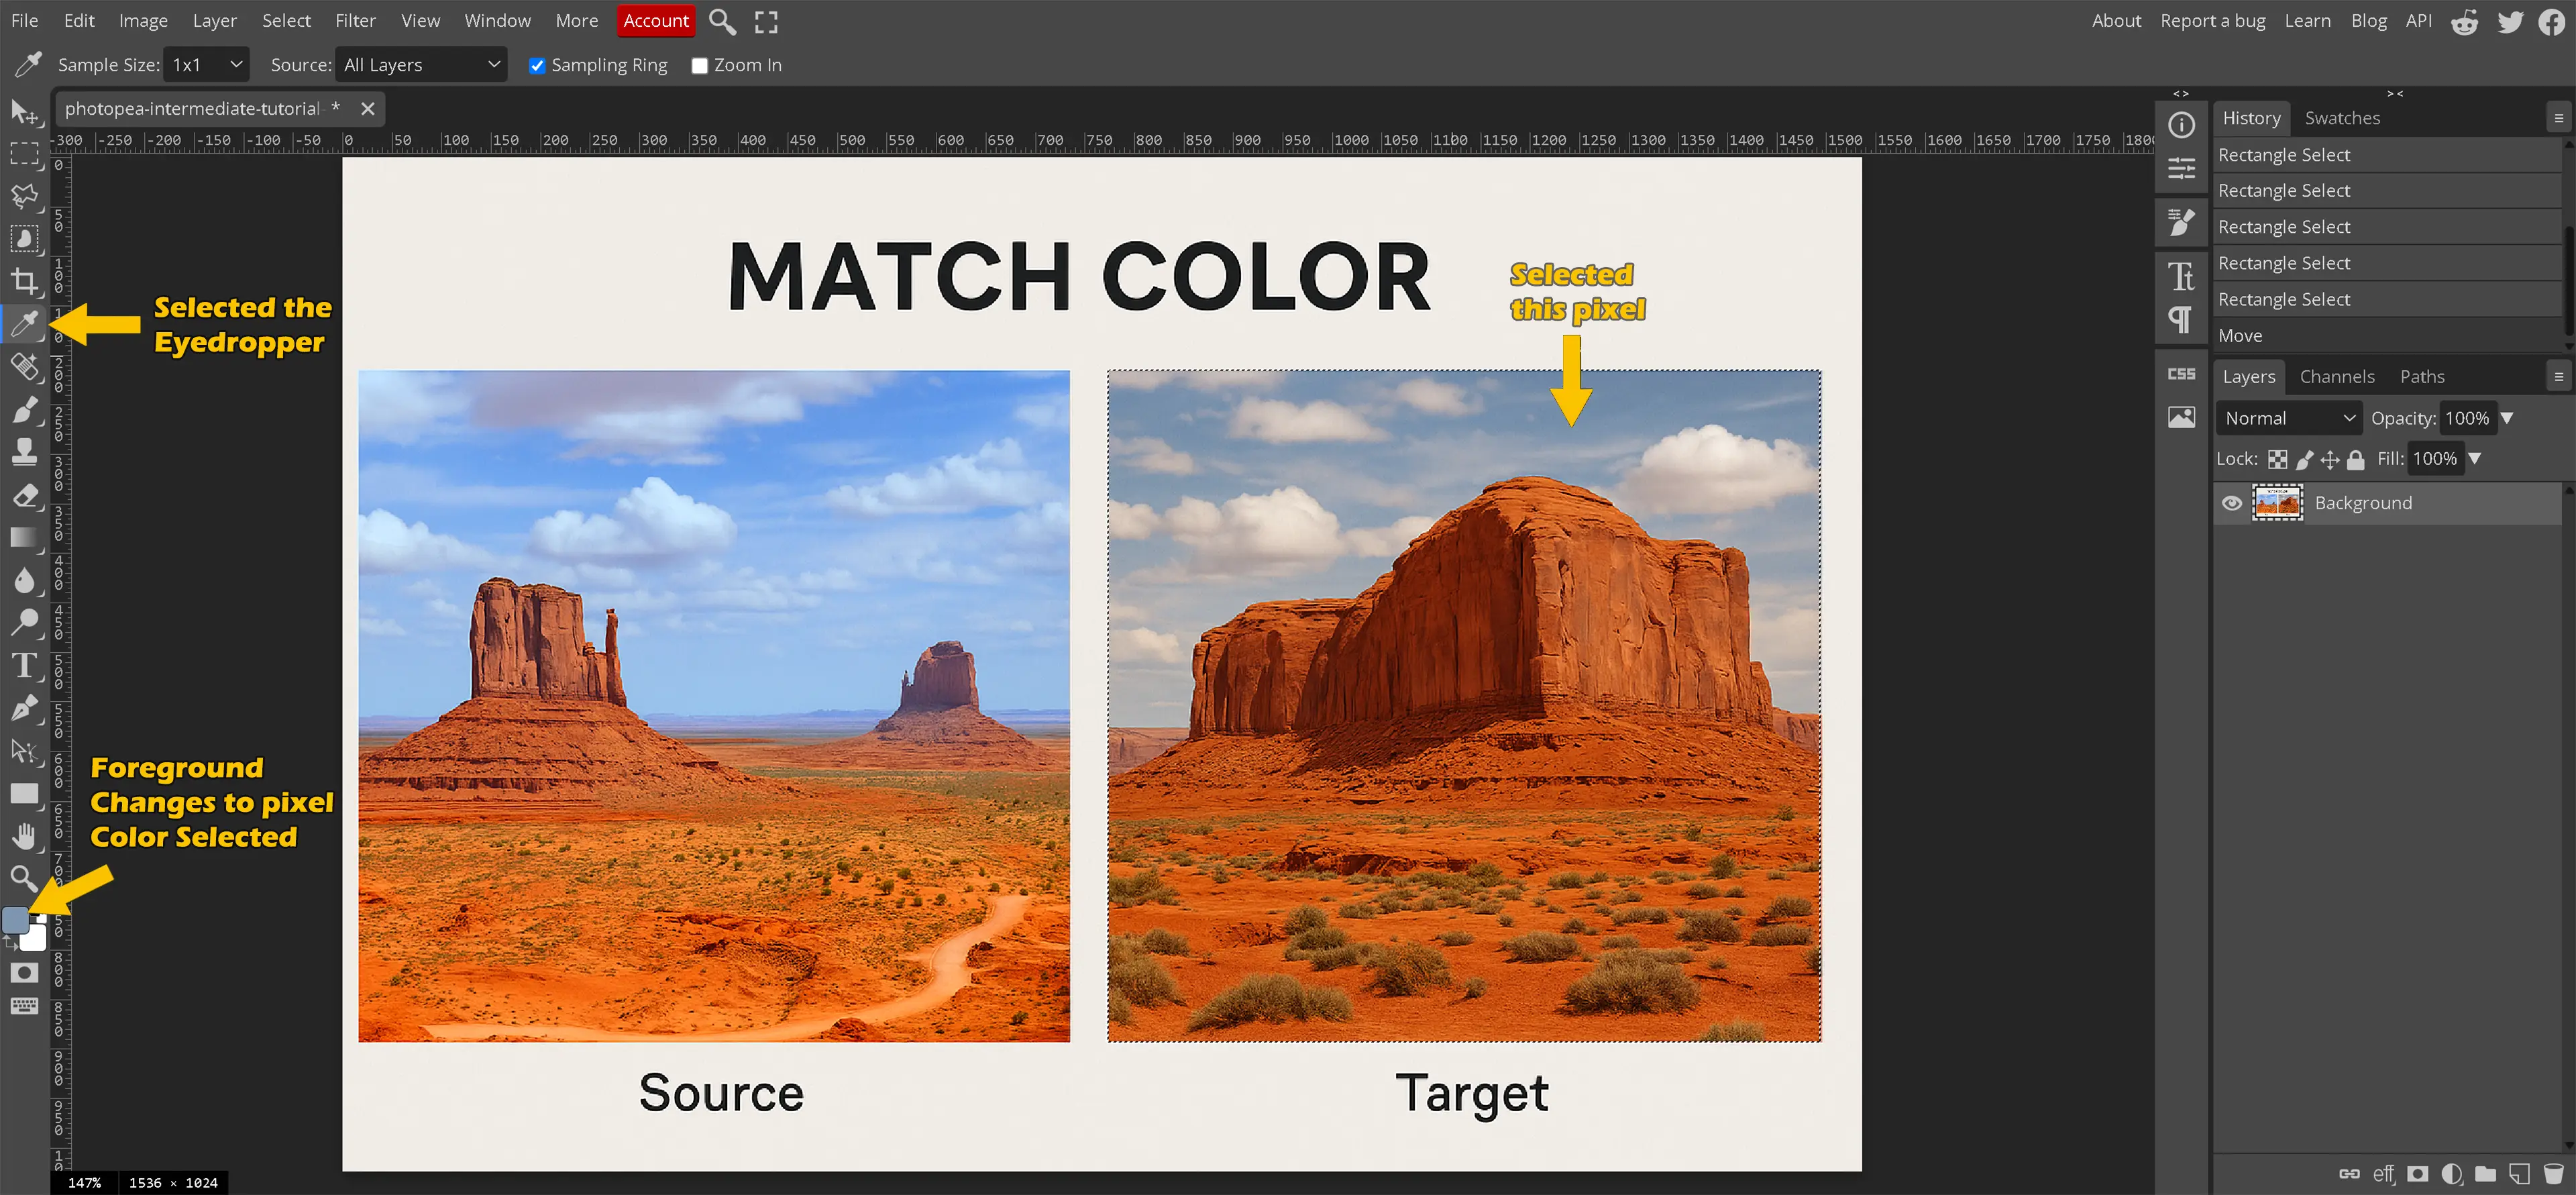
Determining the exact color of an image begins by identifying the specific color of a single pixel. This is most easily done using the Eyedropper Tool, which allows precise selection of any location within an image. Once clicked, it samples the color from that pixel and displays the hexadecimal code associated with it. This hex code provides the precise color information and becomes essential when attempting to change the color of an image accurately.
The Eyedropper Tool is located in the left-hand toolbar of Photopea. After selecting the tool, click anywhere on the image to sample a color. That color immediately updates in the Color Picker box, which appears in the lower-left corner of the interface. The two color squares shown there represent the foreground and background colors. The left square displays the foreground color and reflects the selected color from the Eyedropper. The right square shows the current background color. To view or adjust the hex code of the selected color, click the left foreground square to open the Color Picker dialog.
Pro Tip: Pressing the X key on your keyboard will swap the foreground and background colors.
The Eyedropper Tool does not work between separate programs or outside of the Photopea environment. However, multiple images can be opened inside Photopea. The Eyedropper Tool may then be used on one image, and the sampled color can be applied in another simply by switching tabs.
What Does Match Color Do for Us?
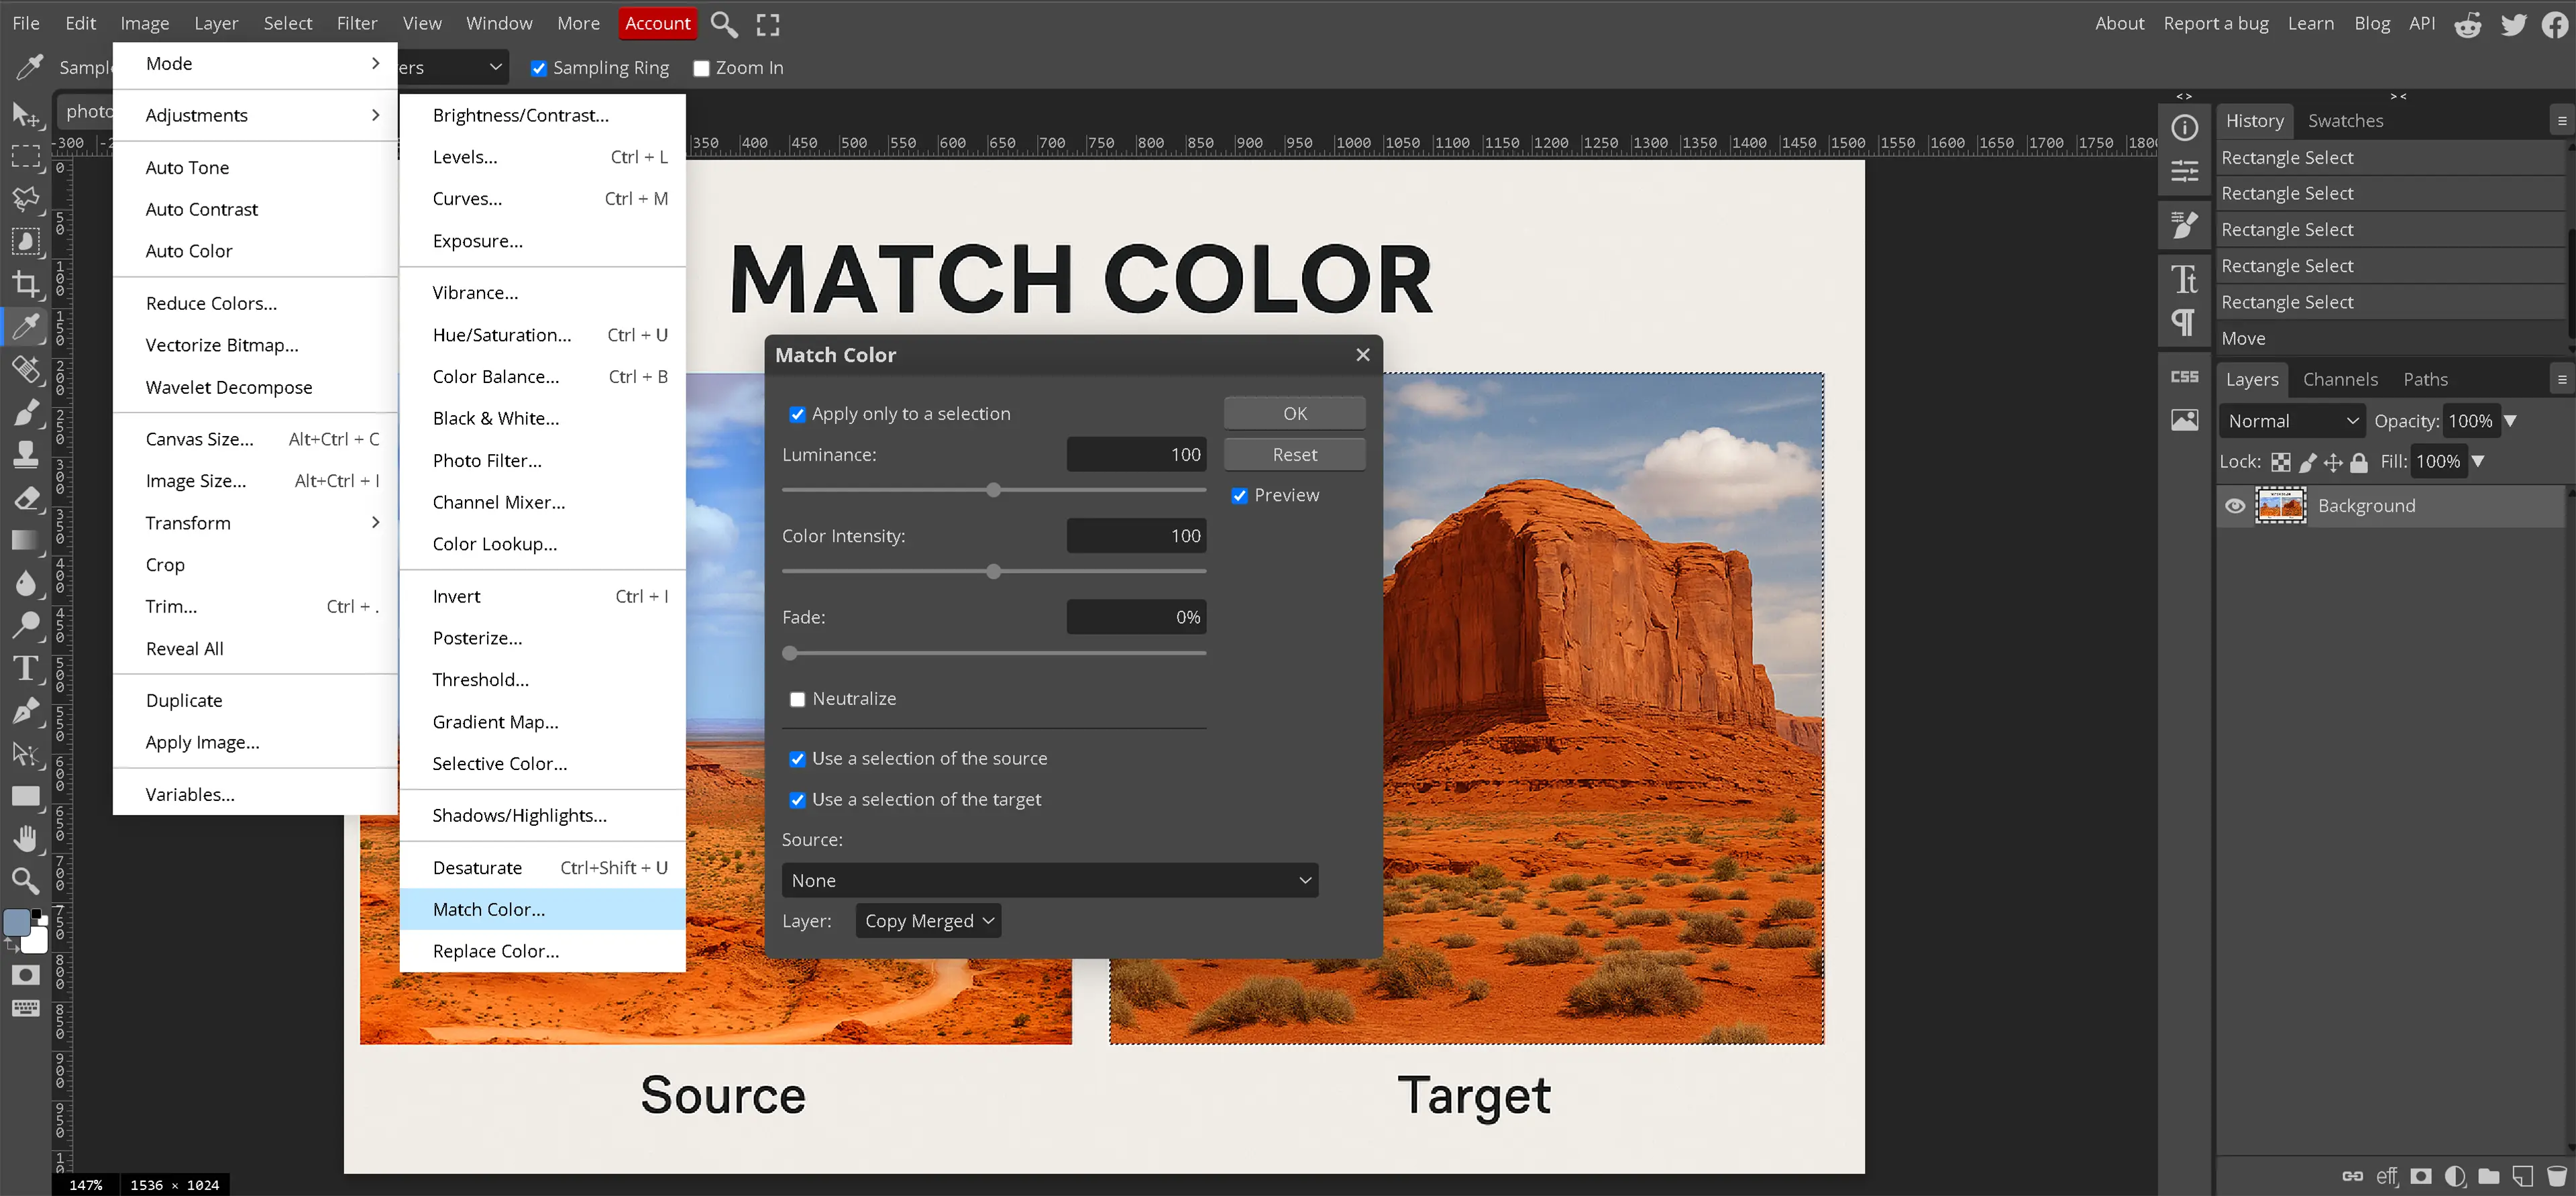
The Match Color feature in Photopea is used to apply the color style of one image to another. It works by comparing the color values in a source image and transferring that look to a different image. This tool is especially helpful when working with collections of images that need to be similar in appearance, such as product photos, a set of portraits, or images intended for the same website or print layout.
Match Color can be found under Image > Adjustments > Match Color. When the panel opens, a source image can be selected from other open files. After that, adjustments for luminance, color intensity, and fade are available to fine-tune how the new colors blend into the target image. It's useful for balancing lighting differences between photos or for giving a group of images a consistent color tone.
This tool can also be used for creative results. A reference image with warm or vintage tones can be used to give other photos the same feel. It's an easy way to apply a visual theme without having to guess at which sliders to adjust. When the goal is to change the color of image groups efficiently, Match Color offers a fast and accurate way to do it.
Why would we use Match Color?
Match Color is useful when a group of images needs to share the same overall tone. Instead of editing each image individually, this tool speeds up the process while helping everything look like it belongs together. Whether matching two photos or applying the same look across several designs, Match Color is a reliable option for color consistency.
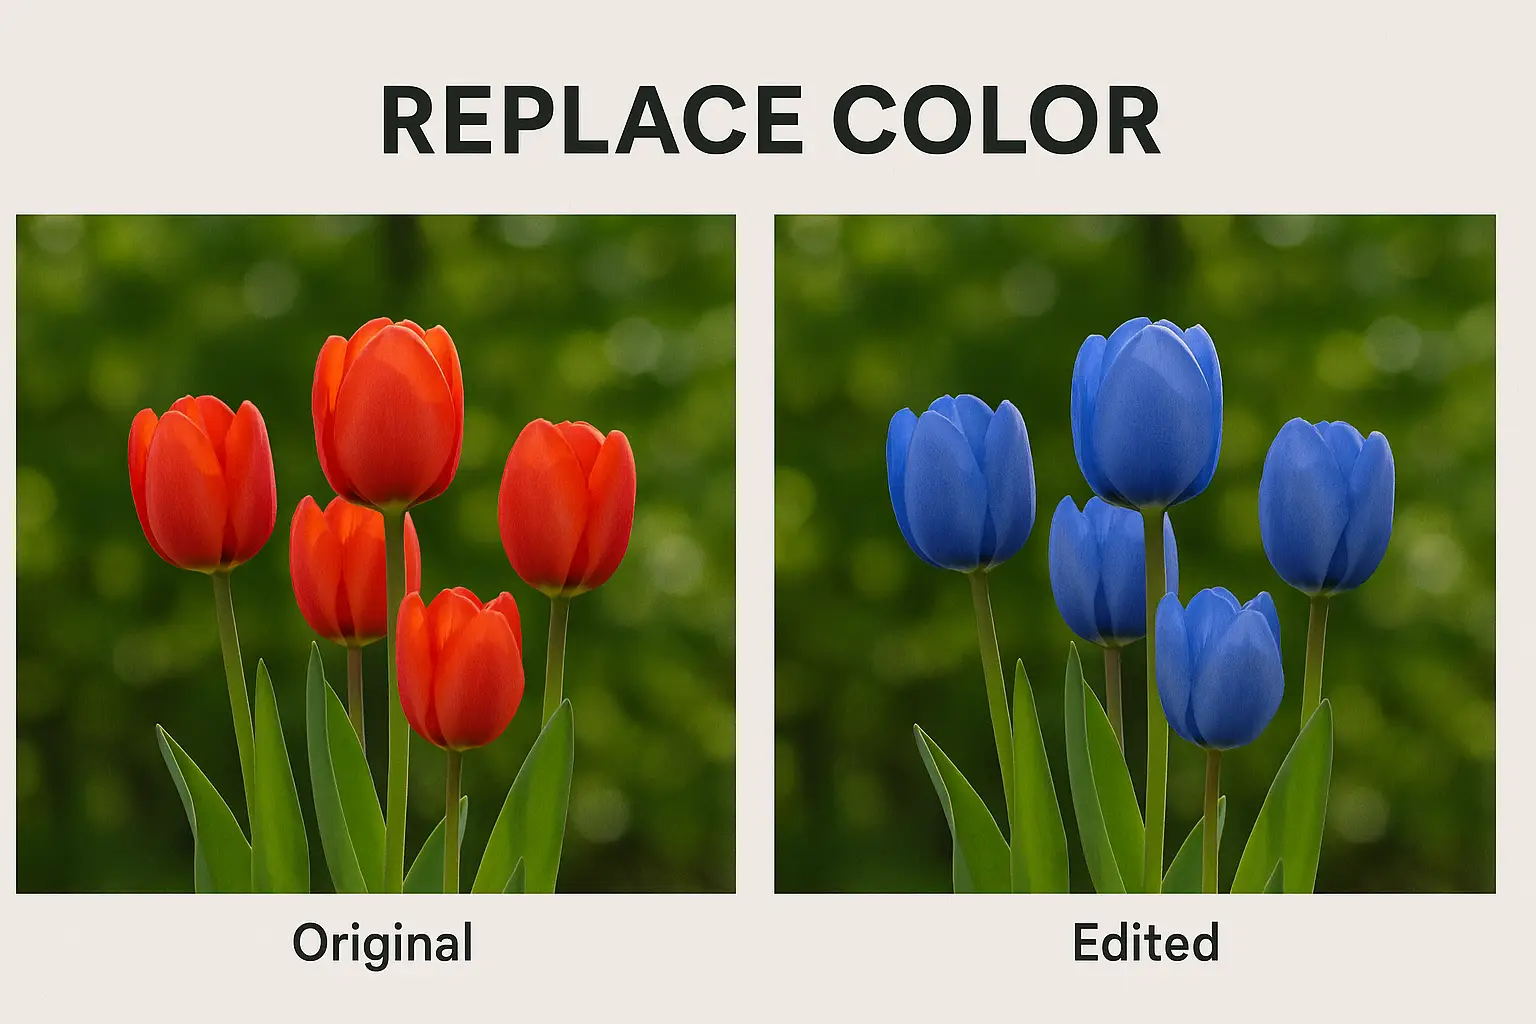
What Does Replace Color Do for Us?
The Replace Color tool in Photopea allows for targeted color changes within specific areas of an image. It works by selecting a color range and replacing it with a new color, without affecting the rest of the photo. This is useful when changing the color of a shirt, background, object, or any other detail that needs to be updated without making broad changes to the entire image.
To access Replace Color, go to Image > Adjustments > Replace Color. A new panel opens with an eyedropper to select the color in the image that you want to replace. After selecting it, use the hue, saturation, and lightness sliders to change how that color appears. The preview updates in real time, and the result is applied when you click OK. The tolerance slider controls how wide of a range is selected based on your color choice, allowing for more or less blending into nearby shades.
Why would we use Replace Color?
Replace Color is ideal when only a specific area of the image needs to change. Whether correcting a color mistake or making a creative adjustment, this tool gives you direct control without changing the rest of the image. It's especially helpful when working quickly or when fine-tuned precision is required.
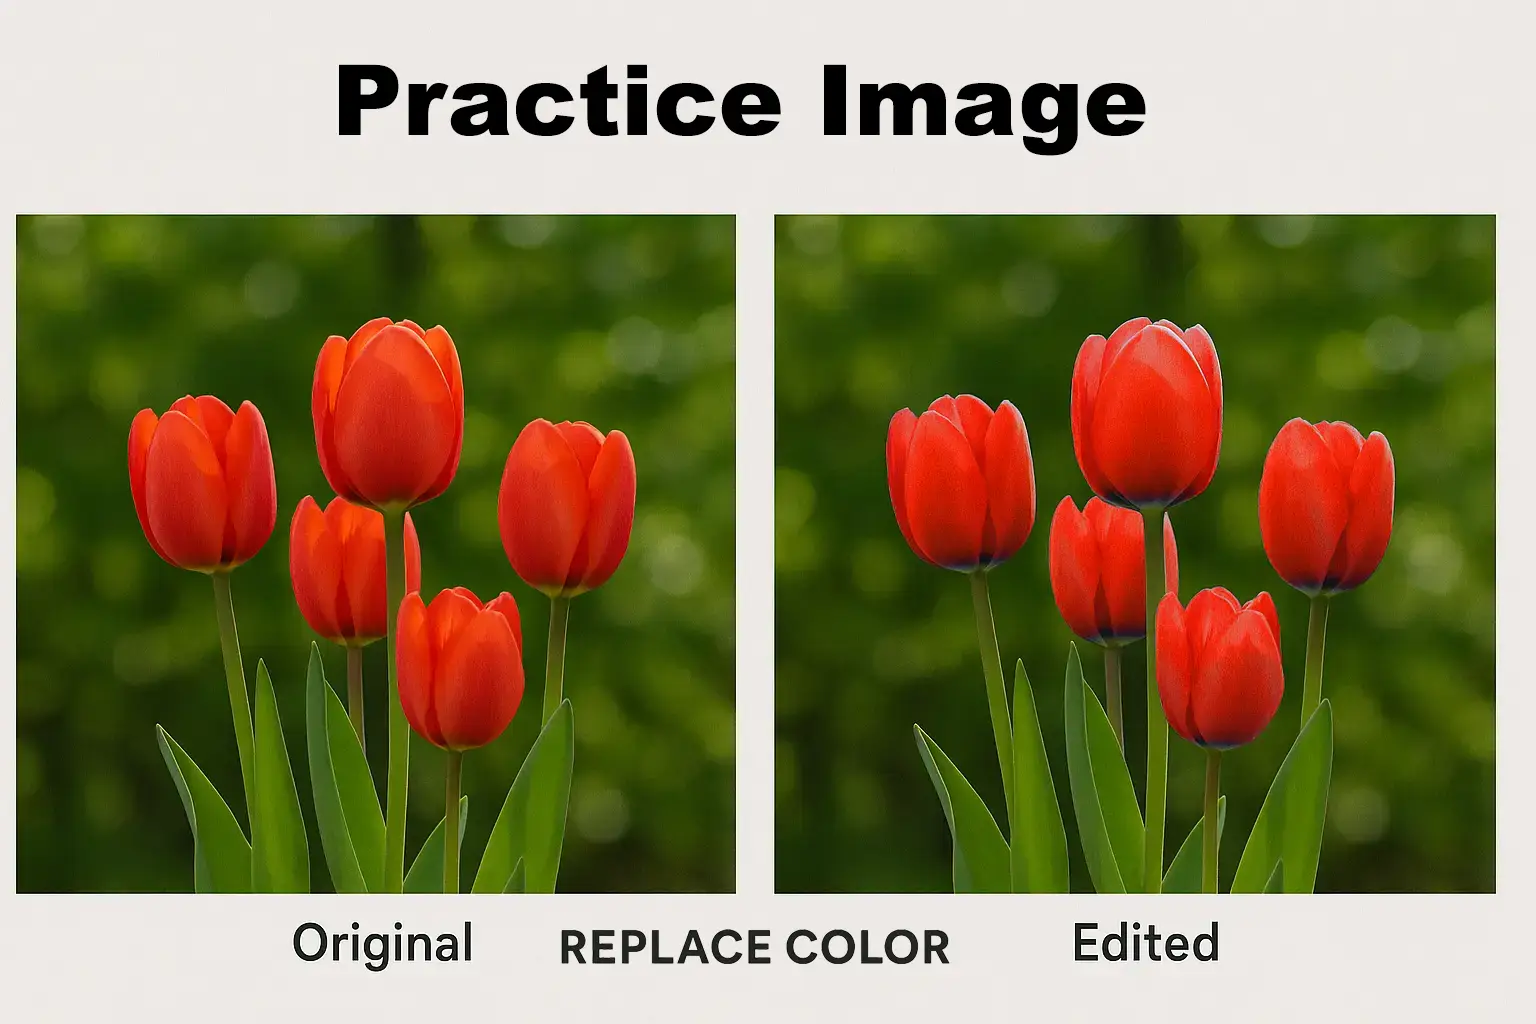
When you need to change the color of an image in a precise, localized way, Replace Color is one of the most effective tools available. It allows you to make fast, focused changes without affecting the overall look or balance of the photo. Practice makes perfect. Using Replace Color, make the red flowers on the the right side of the practice image look like the blue flowers in the image we have edited.
Here is another practice image.
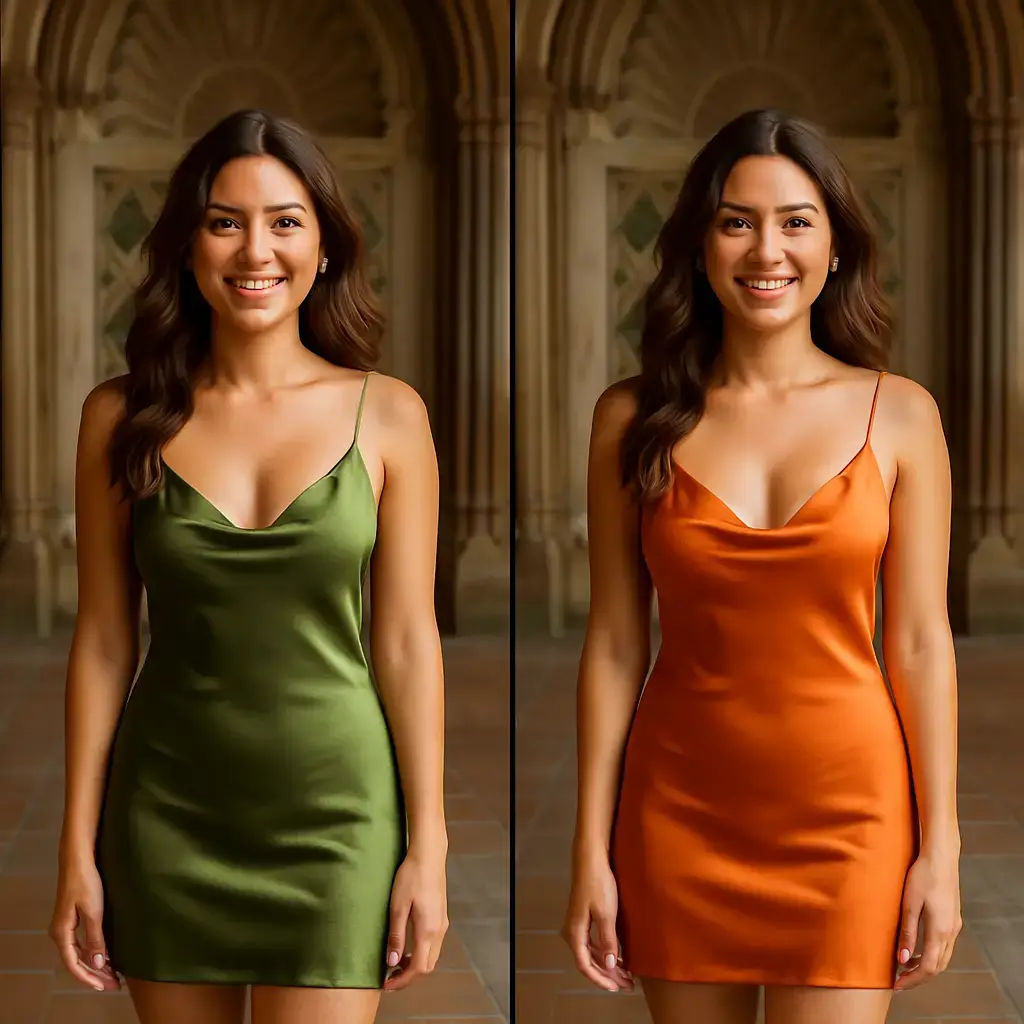
Using Replace Color, change the dress color from orange to purple.
What Does Channel Mixer Do in Photopea?
The Channel Mixer in Photopea changes how much red, green, and blue are used to create the colors in an image. It allows fine control over how colors look across the entire photo. For example, adding more red into the blue areas can make a picture feel warmer. This tool is helpful for correcting color problems or creating creative effects, especially when other tools like hue or saturation do not give the right results.
Instead of changing just one color, Channel Mixer adjusts the entire mix of colors. This makes it useful when the goal is to change the color of image areas that affect the full photo. It can fix lighting problems or shift the overall mood by making the image appear cooler or warmer. The tool updates live, so each change can be seen right away, making it easier to test small adjustments and decide what looks best.
To open Channel Mixer, go to Image > Adjustments > Channel Mixer. There will be three sets of sliders for red, green, and blue. These sliders change how much of each color is used. For example, using more red in the green sliders will cause some parts of the image to shift toward yellow. These controls can also be used to turn a color image into black and white, while keeping certain areas lighter or darker depending on the mix.
Channel Mixer is helpful when trying to change photo color across the full image instead of just one object. While Match Color or Replace Color focus on matching or replacing parts, Channel Mixer changes the entire image's look. It is best used when a picture needs to have a different color feeling, or when small fixes are needed without affecting individual objects. It offers a smooth way to change the color of picture details while keeping the result consistent.